How To Tell If A Soldering Iron Is Hot Enough: Guide
Your iron is hot enough when solder melts and wets in under two seconds.
If you want clean joints and fewer headaches, you must know how to tell if a soldering iron is hot enough. I’ve spent years building and fixing boards, and I’ll walk you through simple checks, clear temperature targets, and pro habits that work. Stick with me and you’ll know exactly when the tip is ready, how to avoid cold joints, and how to tune for any job.
What “hot enough” really means
Hot enough means the tip can bring the joint above the solder’s melting point fast, then keep it there long enough for the solder to flow and wet the metals. For 63/37 or 60/40 leaded solder, the melt point is about 183–190°C. For common lead‑free alloys like SAC305, it is about 217°C. The tip must be hotter than that to transfer heat into pads and leads.
On a small through‑hole joint, the solder should flow in one to three seconds. On a ground plane or a large terminal, it may take three to five seconds with a bigger tip. If it takes much longer, the joint and tip are not keeping up. Knowing how to tell if a soldering iron is hot enough starts with these timing cues and melt points.
Fast, safe tests you can do in seconds
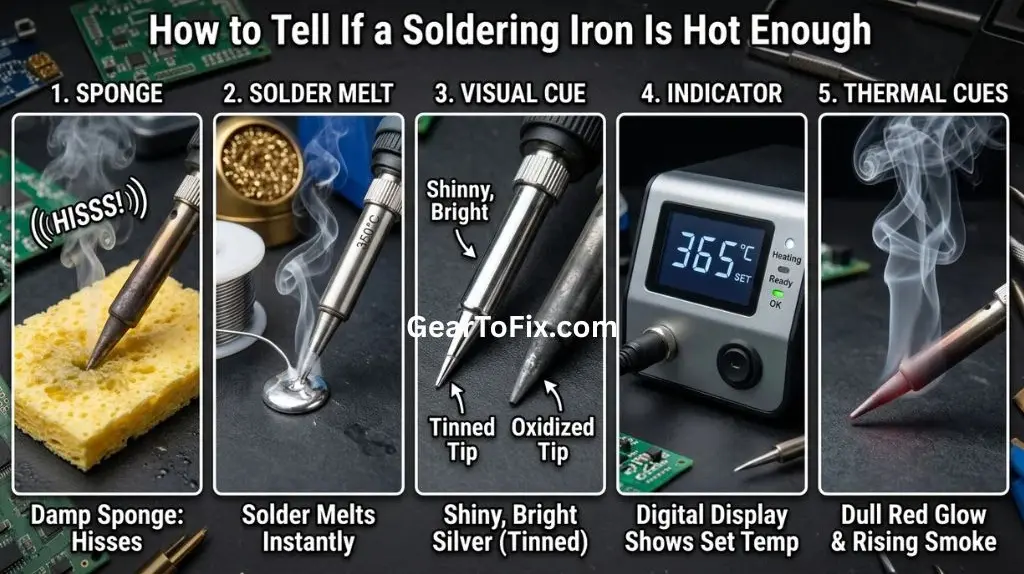
Use these quick checks before you touch the real joint. They are simple and repeatable. This is how to tell if a soldering iron is hot enough without guesswork.
Tin test on the tip
- Feed a small bit of your solder to a clean tip.
- It should melt and wet the tip in under one second.
- If it beads up or takes longer, the tip is cold or dirty.
Flux sizzle check
- Touch rosin flux to the tip.
- A quick sizzle and light smoke in one to two seconds is a good sign.
- No action means it is still warming or the tip is oxidized.
Scrap joint rehearsal
- Touch the tip and solder to a spare copper pad or wire.
- Proper heat makes solder wick and form a smooth fillet fast.
- Slow flow or dull paste look means not hot enough or poor contact.
Dwell‑time rule on the real joint
- Start a joint and count “one‑one‑thousand, two‑one‑thousand…”
- If solder has not flowed by three seconds on a small joint, stop and reassess.
- Increase temperature a bit, use a larger tip, or add flux.
Tip wetness check
- A ready tip looks bright with a thin, even tin coat.
- A black, crusty tip cannot wet or transfer heat well. Re‑tin or use tip tinner.
Never touch the tip with your finger or fling solder. Brass wool is better than a wet sponge for cleaning because it avoids thermal shock. These steps make how to tell if a soldering iron is hot enough quick and safe.
Temperature targets and tip choices that work
Picking the right tip temperature and tip size makes the biggest difference. Here is what I use day to day, based on manufacturer datasheets and common industry practice.
Leaded solder (60/40 or 63/37)
- Typical: 315–350°C
- Heavier joints: 350–370°C
Lead‑free solder (SAC305, Sn99C)
- Typical: 350–380°C
- Heavier joints or ground planes: 380–410°C, with short dwell
Tip size and shape
- Small SMD pads: small chisel or hoof tip for better contact.
- Through‑hole: medium chisel for most work.
- Ground planes: larger chisel or bevel for more thermal mass.
Power and recovery
- A 60–90 W temperature‑controlled station handles most jobs.
- Cheap fixed‑wattage pens may warm slowly and drop under load.
Match solder alloy, board mass, and tip size. This is the most reliable way to set up how to tell if a soldering iron is hot enough before you solder a single joint.
Measuring tip temperature the right way
You can measure instead of guessing. Here are the methods I trust, plus one I avoid.
Contact tip thermometer
- A small thermistor or thermocouple pad designed for tips.
- Gives a good reading in seconds. Great for calibration days.
Fine‑bead thermocouple
- Tape or clip the bead to a small copper pad.
- Touch the tip to the pad and read the rise. Reflects real heat transfer.
Built‑in station readout
- Good for repeatability, but it reads the heater, not the wet tip.
- Check it against a thermometer and adjust offset if your station allows.
IR thermometer
- Not reliable on shiny metal tips due to low emissivity.
- I avoid IR for tips; it is fine for preheaters and matte surfaces.
Test and log your results. A two‑minute check can save hours of rework. Measured data backs up how to tell if a soldering iron is hot enough on your setup.
Read the joint: visual and timing cues
The joint tells the truth. Watch and learn these signs to confirm how to tell if a soldering iron is hot enough during work.
Flow behavior
- Solder should wick toward heat and wrap the lead in one sweep.
- If it balls up, add flux and check contact or temperature.
Surface finish
- Leaded: bright and smooth when cooled.
- Lead‑free: smooth satin, not dull and grainy.
Fillet shape
- Concave fillet that climbs the lead is ideal.
- Flat blobs or gaps point to low heat or dirt.
Timing
- Small joints: one to three seconds from contact to flow.
- If you hit five seconds, stop. More time can lift pads or cook parts.
These cues become second nature. They are the clearest way to confirm how to tell if a soldering iron is hot enough in real time.
Common mistakes, safety, and pro habits
I have made most of these mistakes so you do not have to. Small changes improve speed and quality.
Mistakes to avoid
- Using a tiny conical tip for big joints. It starves the joint of heat.
- Cranking temperature high to “brute force” it. You will burn flux and pads.
- Letting the tip go dry. Oxidation kills wetting and heat transfer.
- Judging only by a wet‑sponge sizzle. It is not a reliable heat proof.
Safety basics
- Use a fume extractor or a fan to move flux fumes away.
- Wash hands after handling leaded solder. Keep food and drinks away.
- Hot metal looks the same as cold. Park the iron in a stable stand.
Pro habits
- Pre‑tin leads and pads when you can. It lowers dwell time.
- Add a dab of fresh solder to improve thermal contact at the start.
- Clean with brass wool and re‑tin before and after each joint.
Follow these and you will always know how to tell if a soldering iron is hot enough and safe to use.
Troubleshooting: not hot enough or too hot?
If joints are not right, sort it fast. Here is how I diagnose and fix it on the bench.
Signs it is not hot enough
- Solder beads and refuses to wet. Dwell time stretches past three seconds.
- Joints look dull or grainy. Flux seems inactive.
- Fixes: raise temperature 10–20°C, use a larger chisel tip, add flux, preheat the board, ensure the tip is clean and tinned.
Signs it is too hot
- Flux burns off with harsh smoke. Pads discolor or lift.
- Plastic bodies soften. Solder scorches and pits.
- Fixes: lower temperature 10–20°C, reduce dwell, use a smaller tip, refresh tip tin, keep the tip moving.
Power sag or poor recovery
- First joint is fine, next ones slow down.
- Fixes: upgrade to a higher‑power station, use cartridge tips with better recovery, keep the cable connections tight.
This checklist tightens your loop on how to tell if a soldering iron is hot enough, joint after joint.
Frequently Asked Questions of How to Tell If a Soldering Iron Is Hot Enough
How long should I wait for my iron to heat up?
Most temperature‑controlled stations are ready in 30–90 seconds. Pen‑style irons can take three to five minutes, especially low‑watt models.
What temperature should I use for lead‑free solder?
Start at 360–380°C and adjust by 10–20°C based on joint size. If dwell exceeds three seconds on small joints, go up or use a bigger tip.
Can I use an IR thermometer on a soldering tip?
It is not reliable on shiny tips due to low emissivity. Use a contact tip thermometer or a fine‑bead thermocouple instead.
Why does my solder ball up and not stick?
The joint is dirty, not hot enough, or lacks flux. Clean the surfaces, add flux, and ensure the tip is tinned and in full contact.
Is a higher temperature always better?
No. Too hot burns flux and damages pads. Use the lowest temperature that gives proper flow in one to three seconds.
Conclusion
You now know the fast checks, the right temperatures, and the cues that matter. Time to flow solder with confidence, avoid cold joints, and protect your parts. Practice the timing rules, pick the right tip, and use simple tests to confirm heat every time.
Put these steps to work on your next project today. If you found this guide useful, subscribe for more hands‑on tips or leave a question and I will help you dial in your setup.

Scott Yarnell is a tool expert focused on practical guides, product research, and real-world tool performance to help readers make informed decisions.